

ODOO'S FUNCTION
Odoo's Master Production Schedule is a robust tool for forecasting stock and creating replenishment plans based on product demand. However, one limitation is that all forecasted demand data needs to be manually inputted for each period, and there is no built-in tracking for the input data.
CLUEDOO'S FUNCTION
CLuedoo introduces an advanced tool that enhances Odoo's Master Production Schedule by offering the following features:
- Planning forecasted demand for multiple periods.
- Keeping track of forecasted demand data with the ability to edit later.
- Assigning warehouse/location for forecasted demand.
- You can select a specific route when adding a product to the MPS.
1. Go to Manufacturing → Planning | 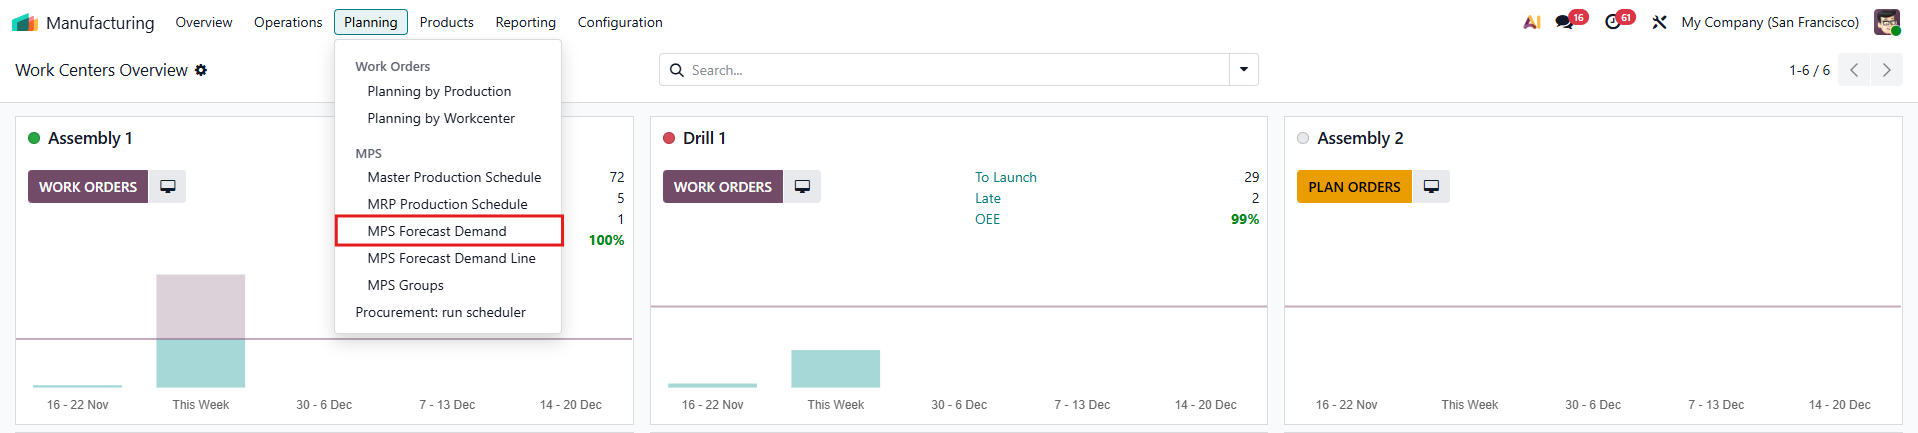  |
2. Input information > Confirm > After the confirmation, the Apply Suggested Replenishment to MPS, Apply Forecast Demand to MPS and Next Period Planning buttons appear. | 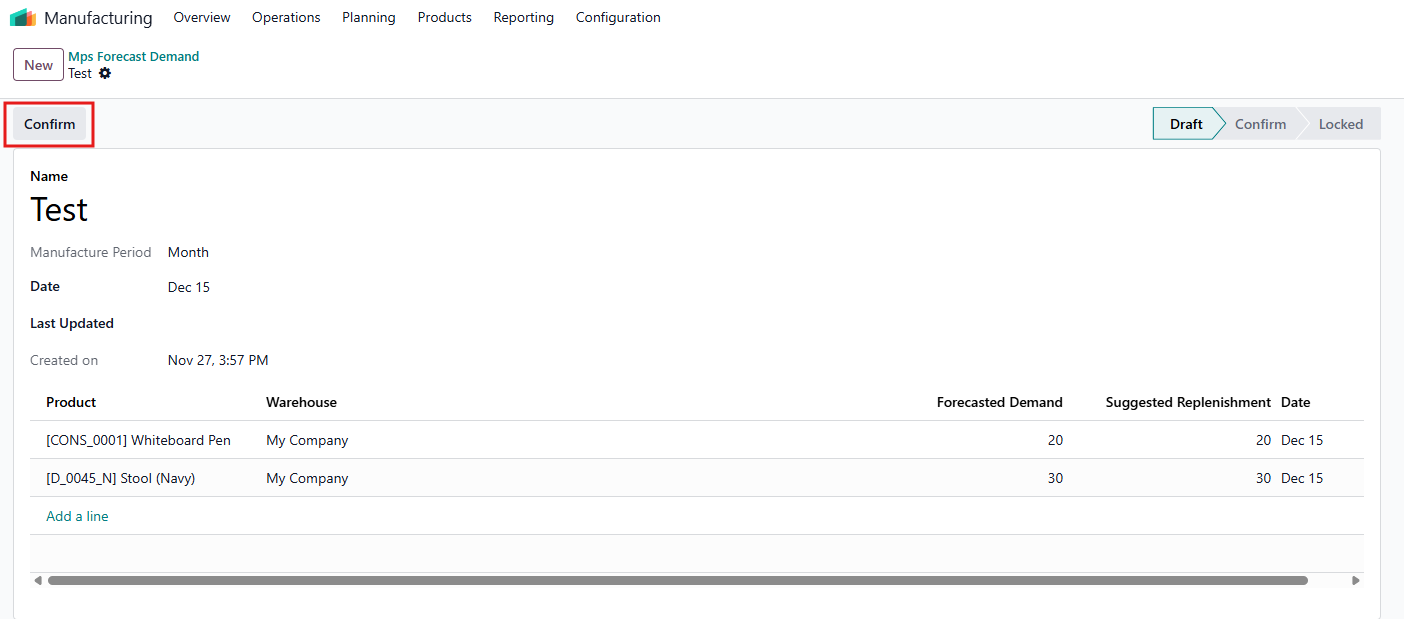 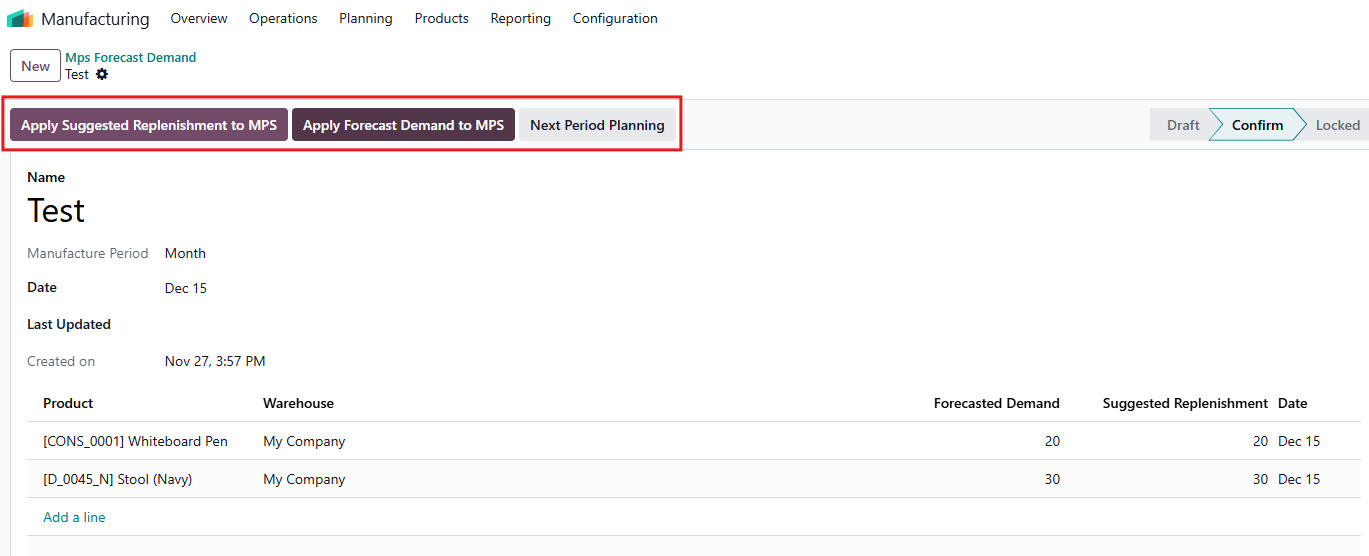 |
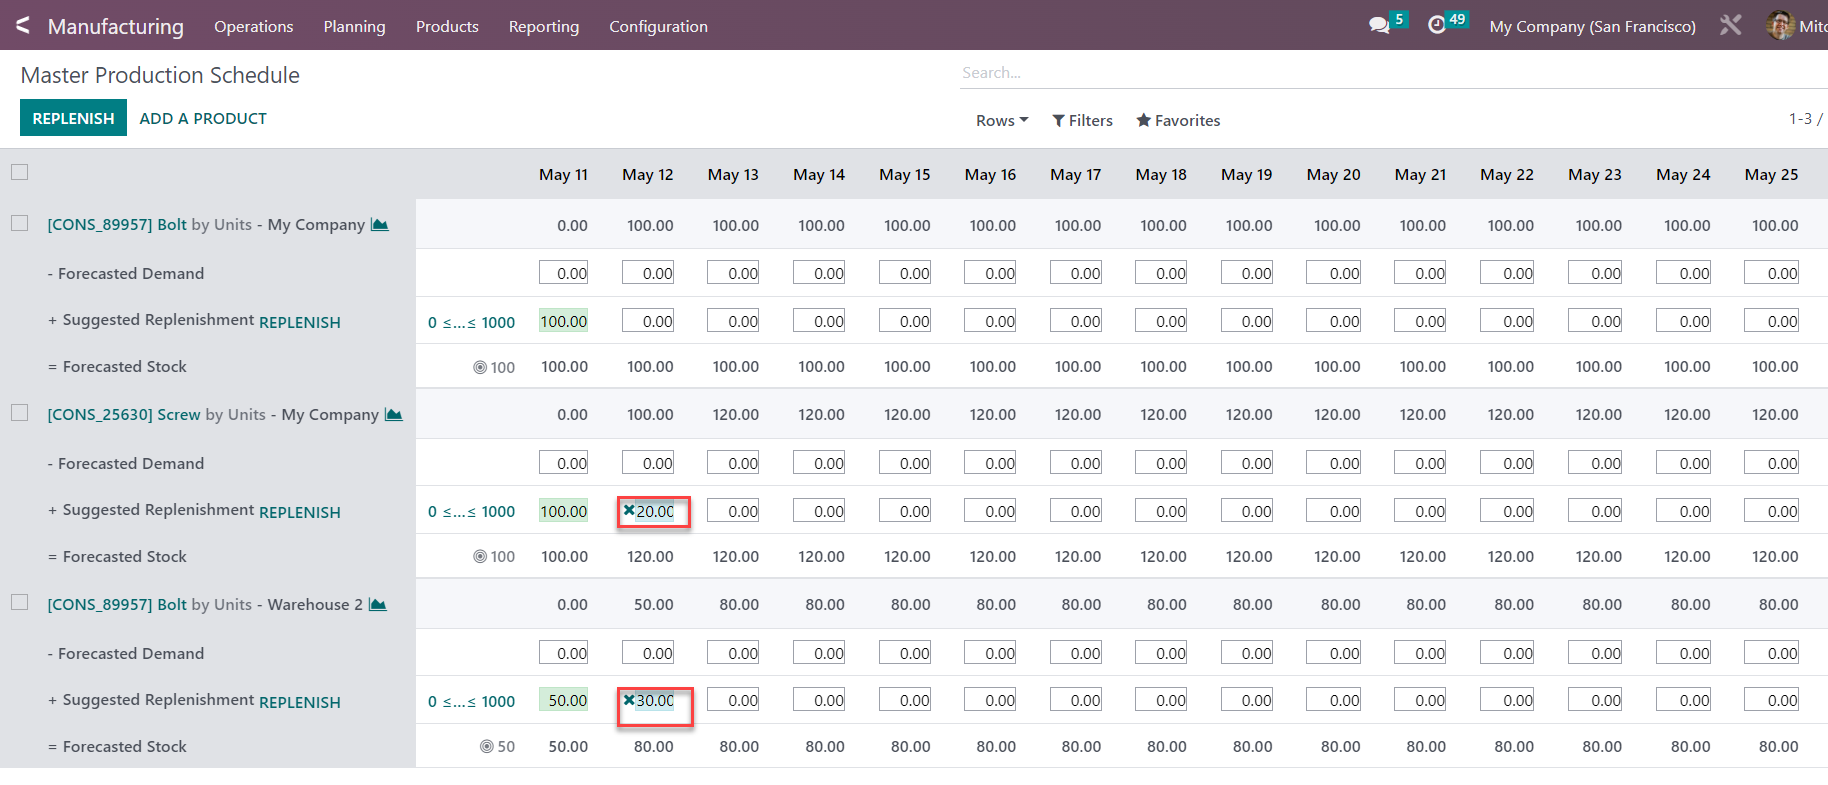
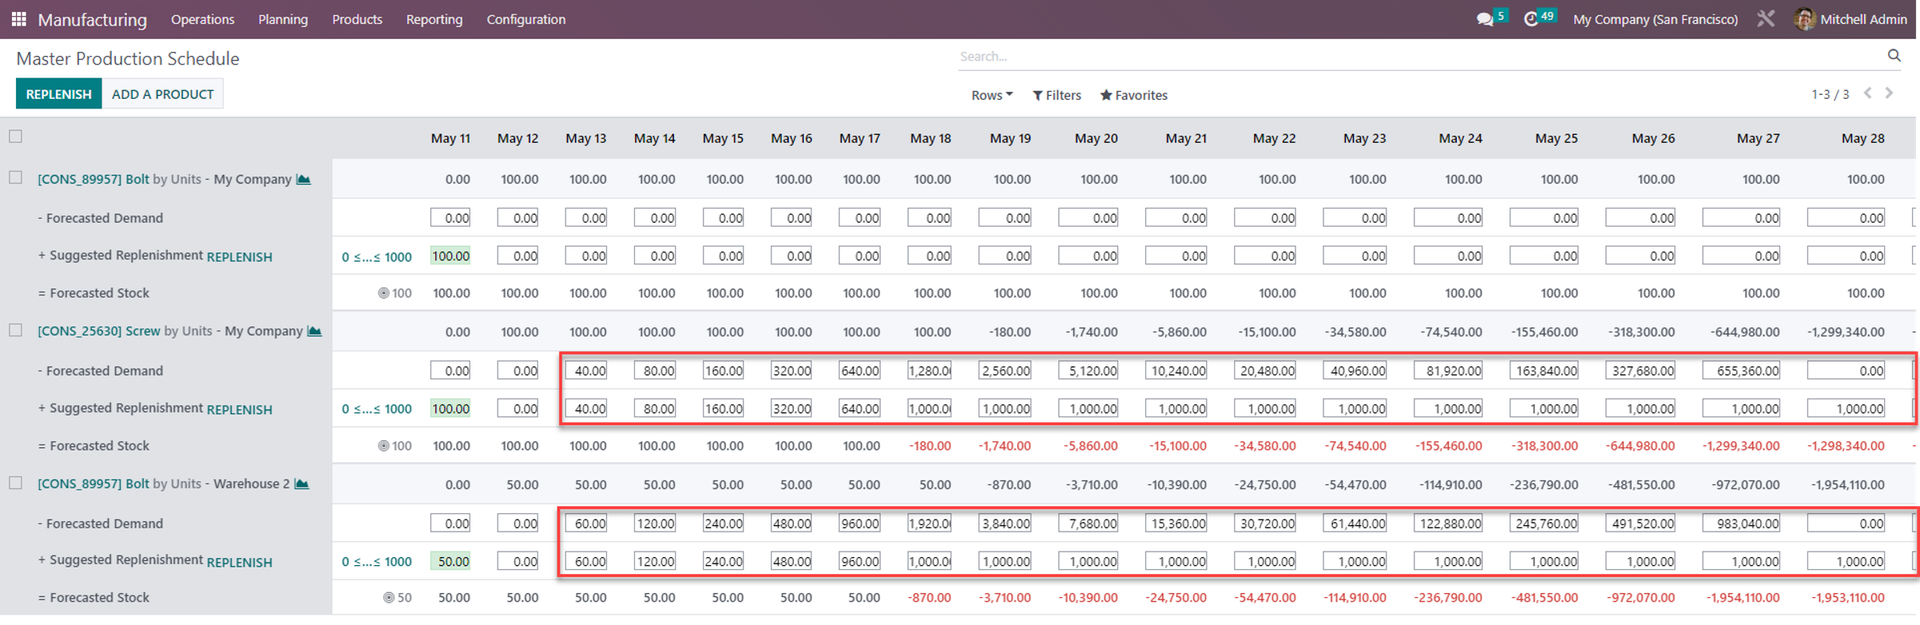
3. To synchronize inputted data, including forecasted demand and suggested replenishment to the Master Production Schedule, click Apply Forecast Demand to MPS. Please note that only products already listed in the Master Production Schedule will be updated with the MPS Forecast Demand. | 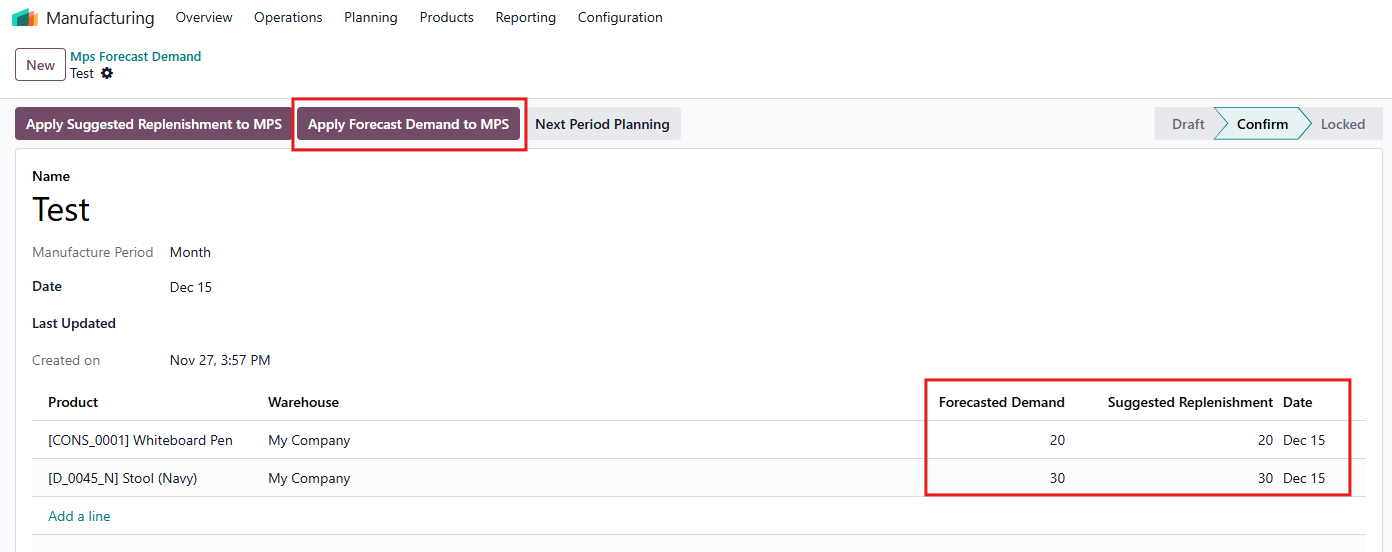 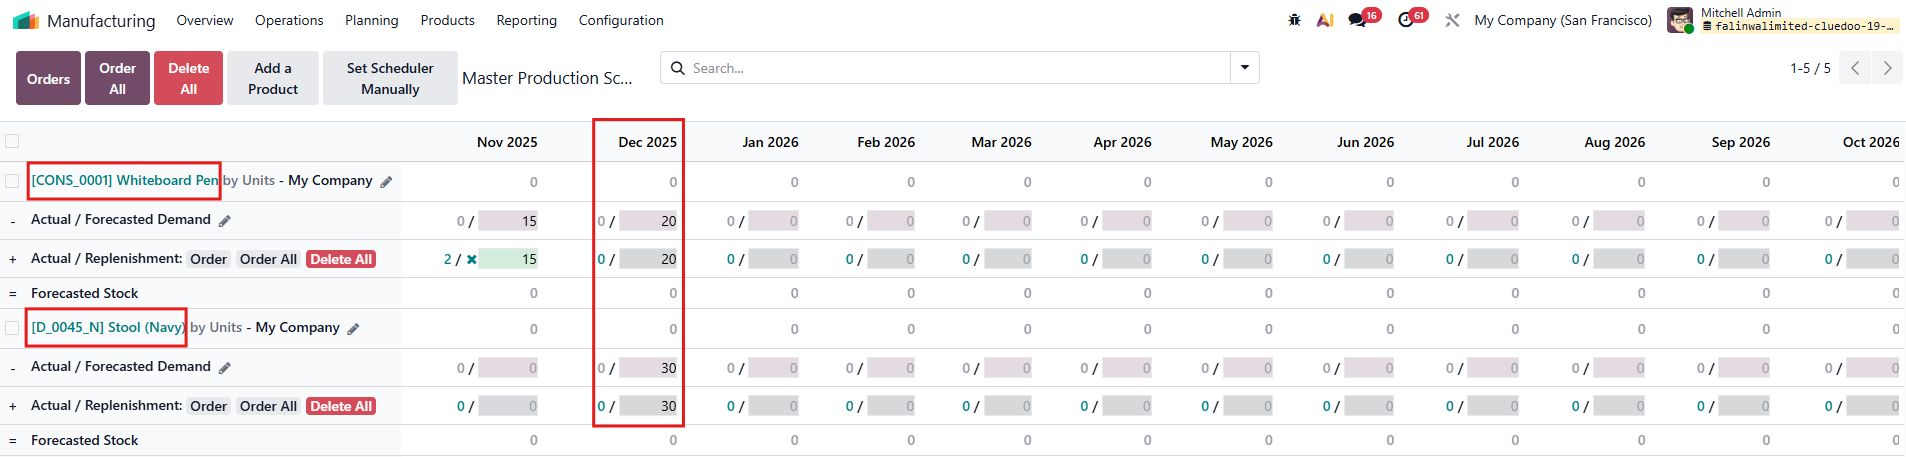 |
4. To synchronize inputted data, specifically suggested replenishment, to the Master Production Schedule, click Apply Suggested Replenishment to MPS. | 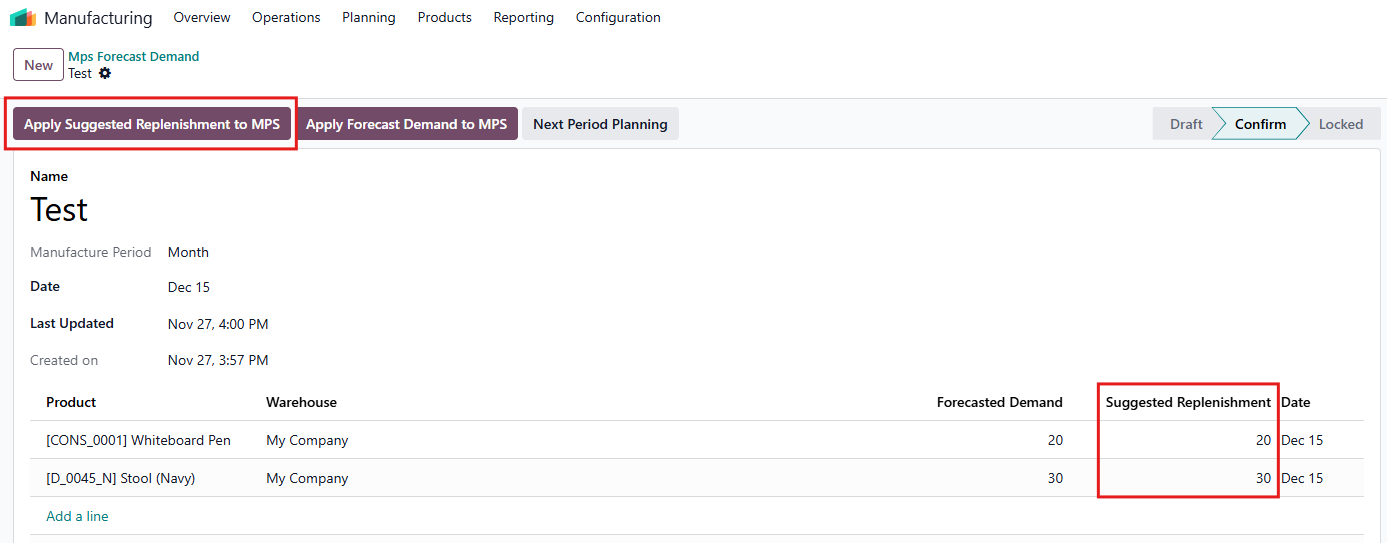 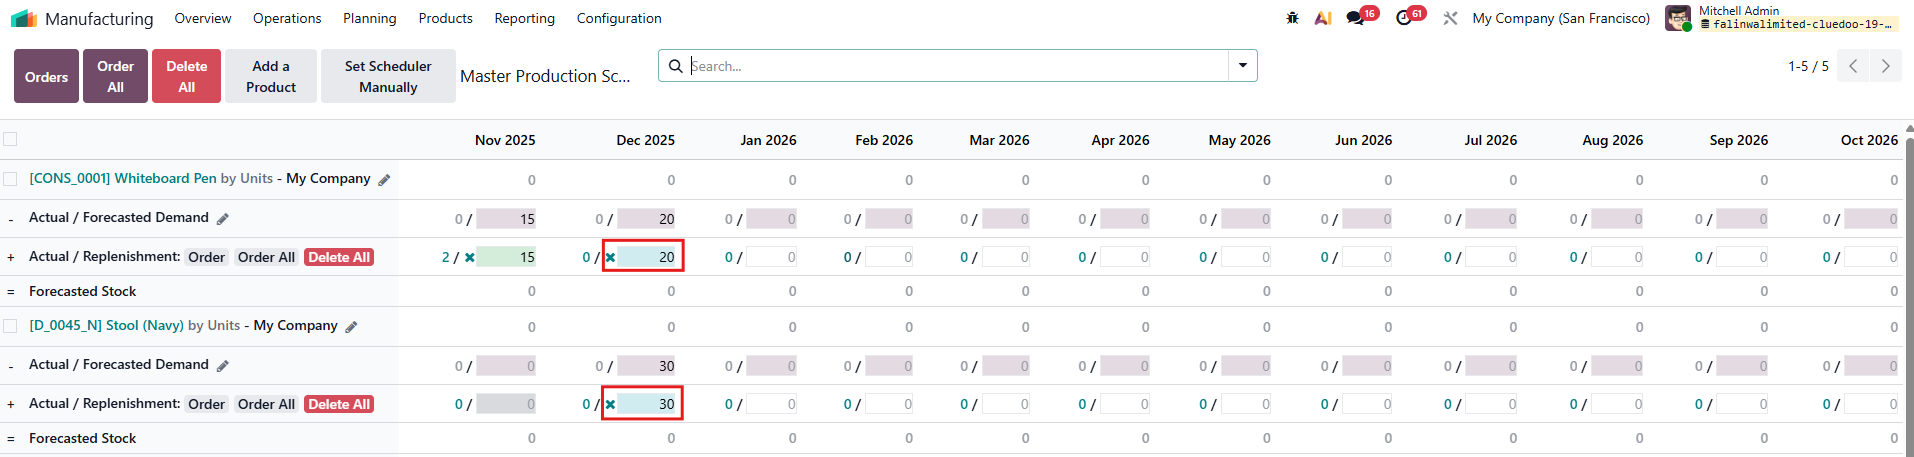 |
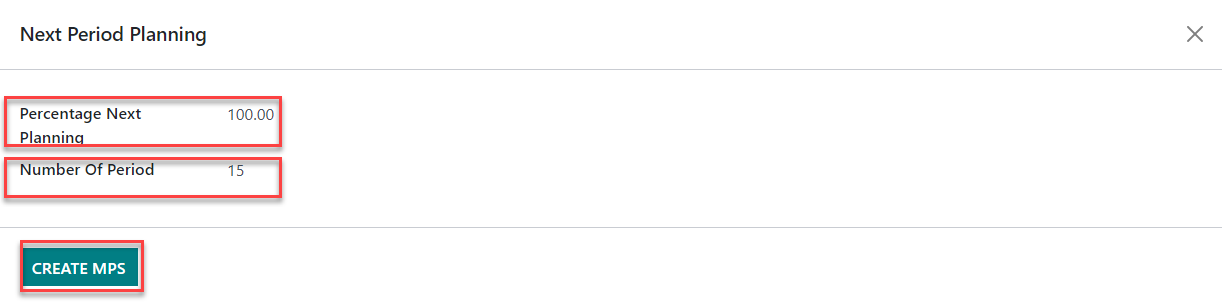
5. To create a rolling forecast from inputted forecast data, click on "Next Period Planning". | 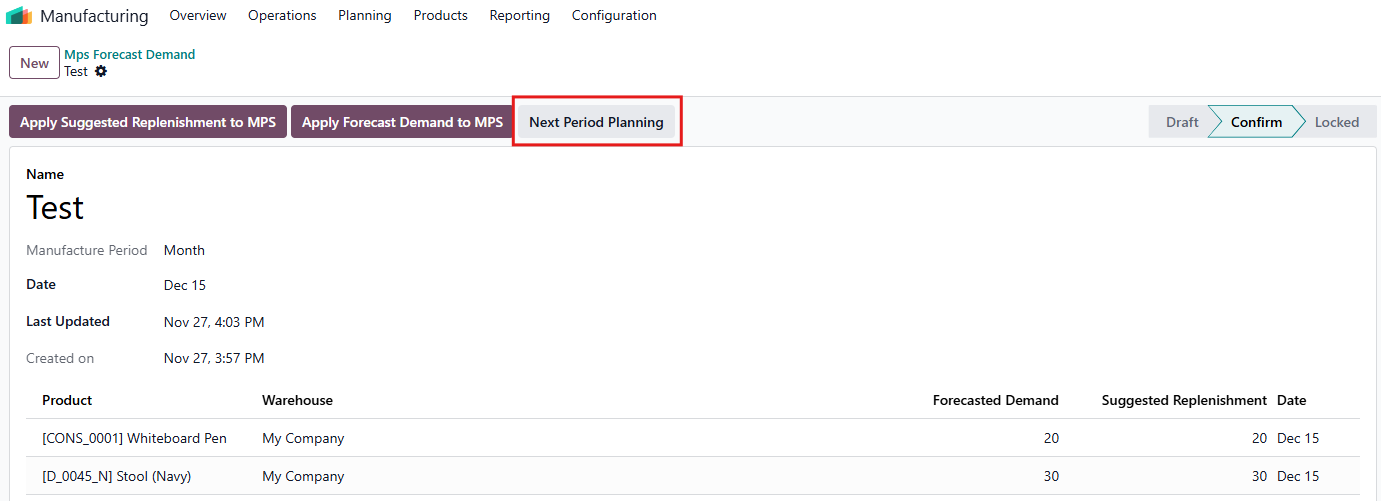 |
6. On the "Next Period Planning" wizard, fill in the period-over-period ratio of forecasted demand and the number of rolling periods. Click on "Create MPS" to confirm. | 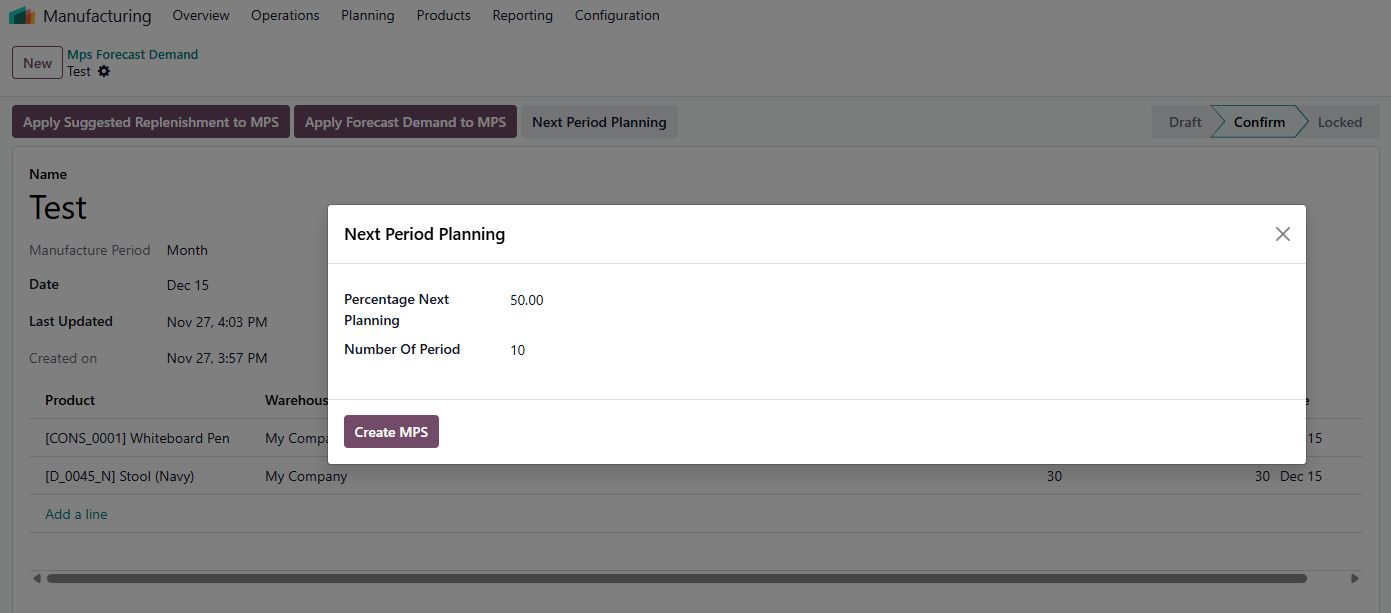 |
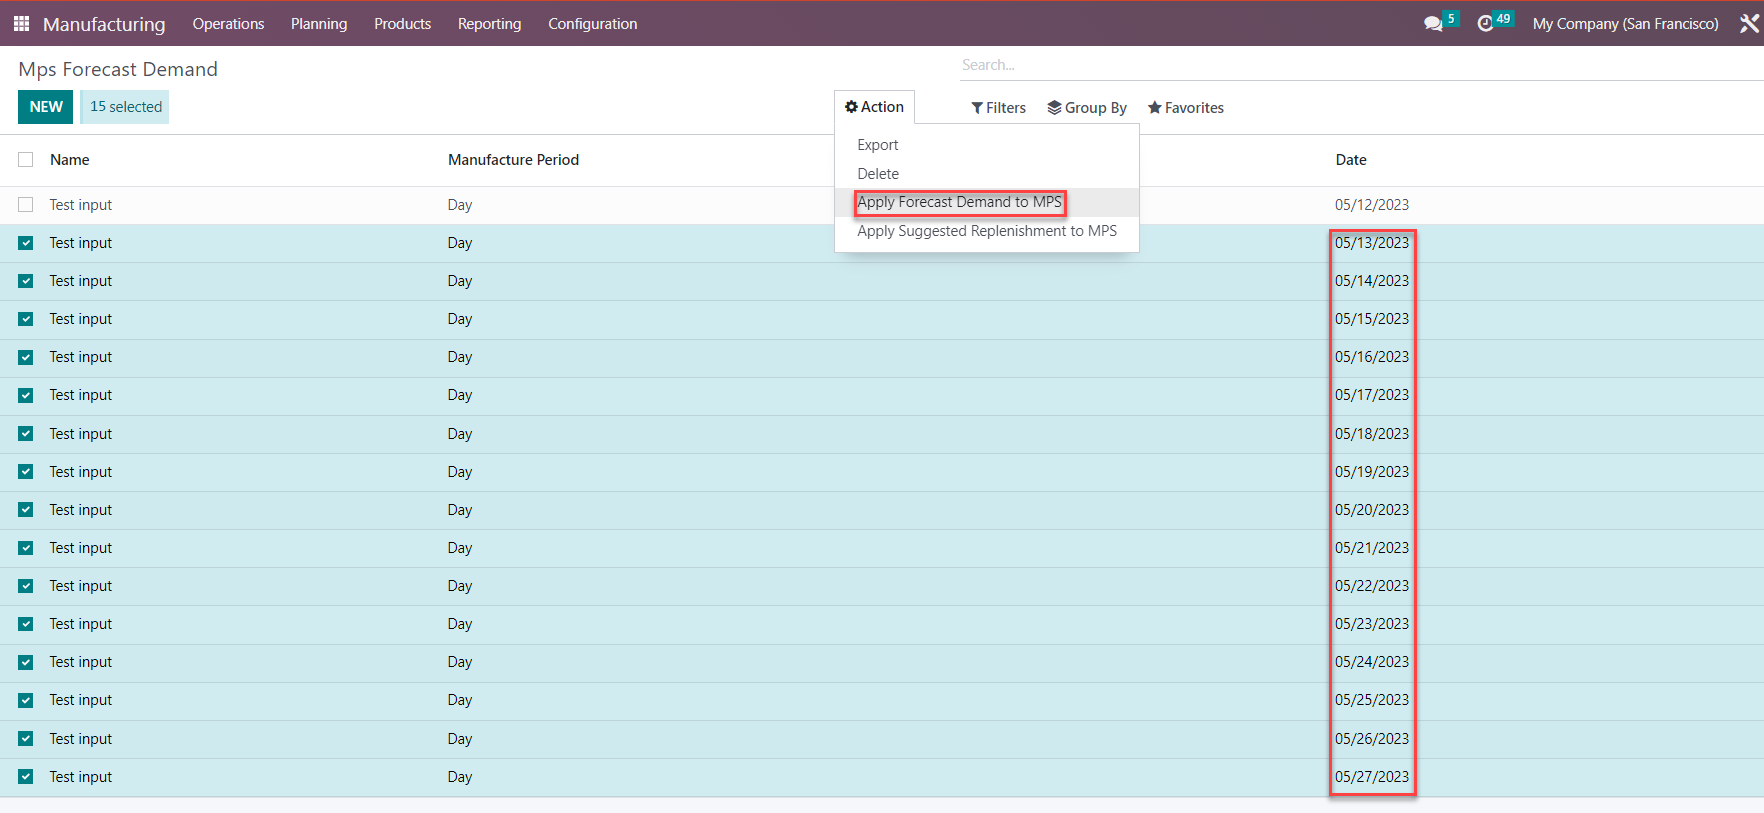
7. Go back to "MPS Forecast Demand" master data. In this example, 10 sets of forecasted demand data have been generated. Select 10 sets of data, go to "Action", and click on "Apply Forecast Demand to MPS". | 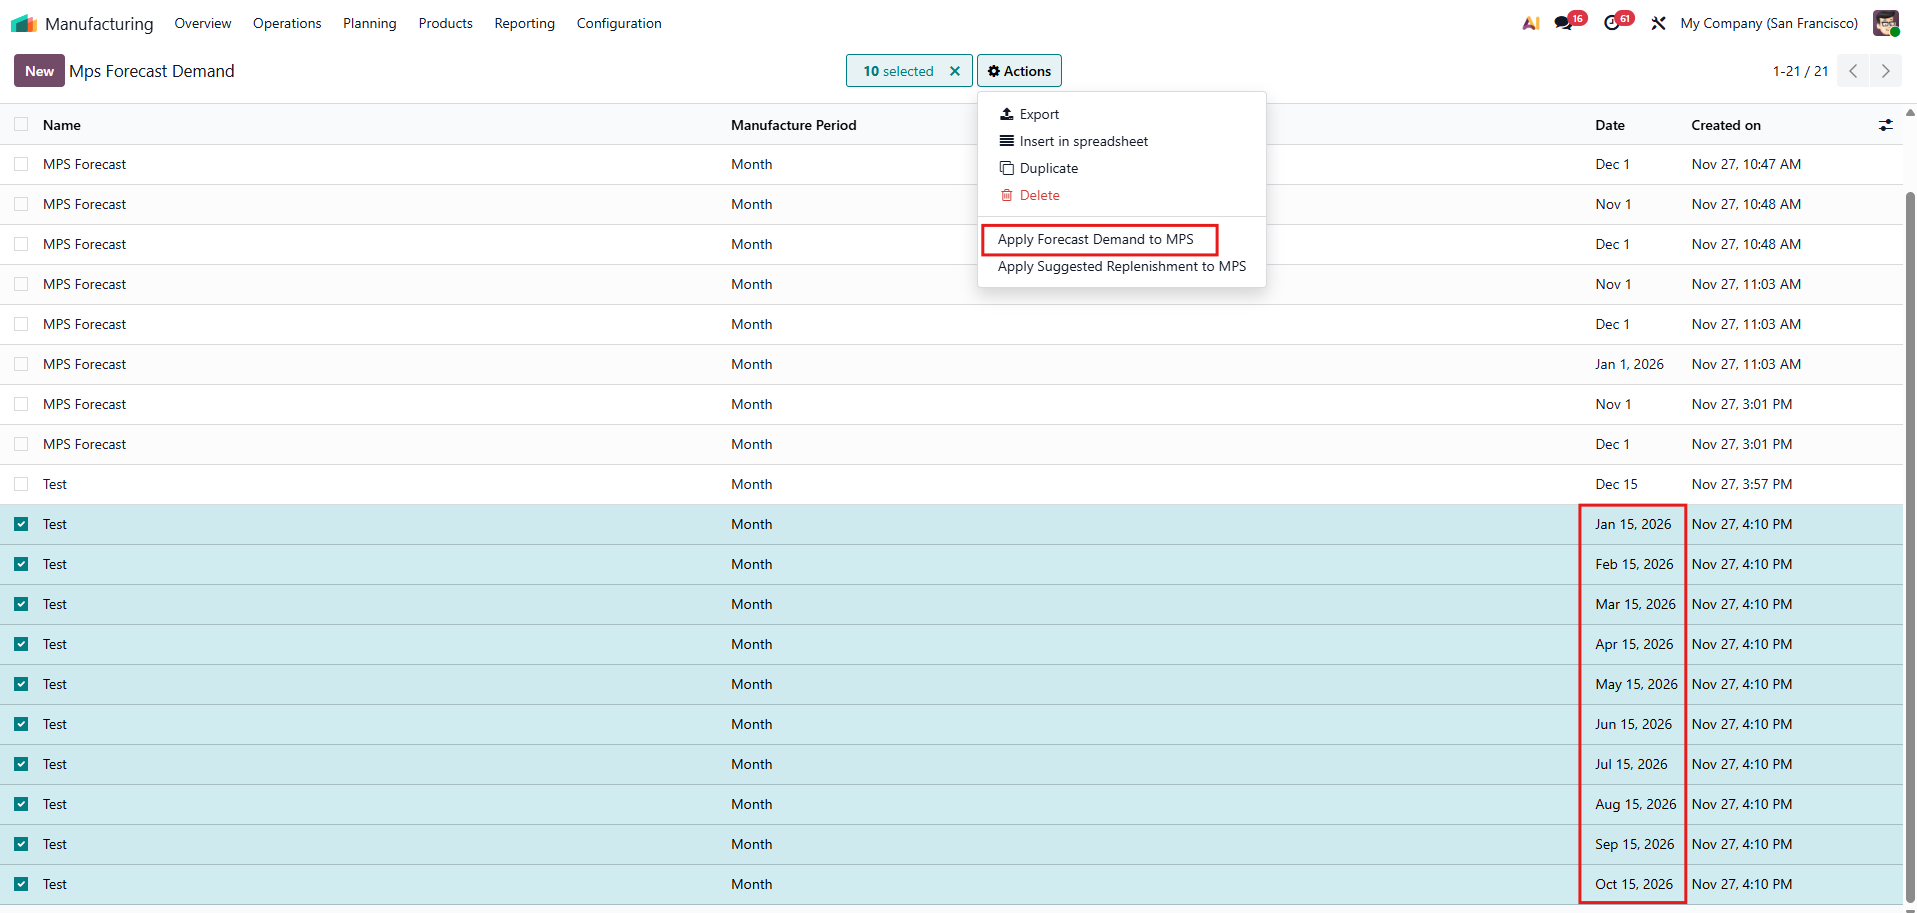 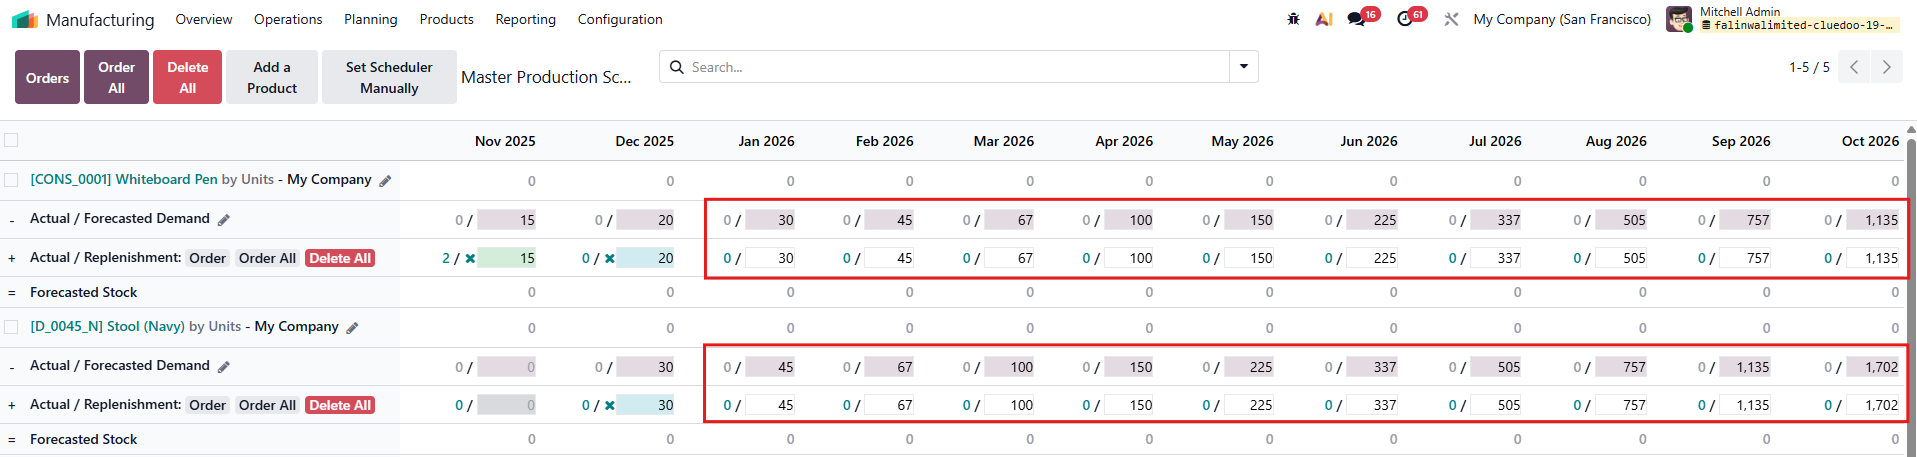 |
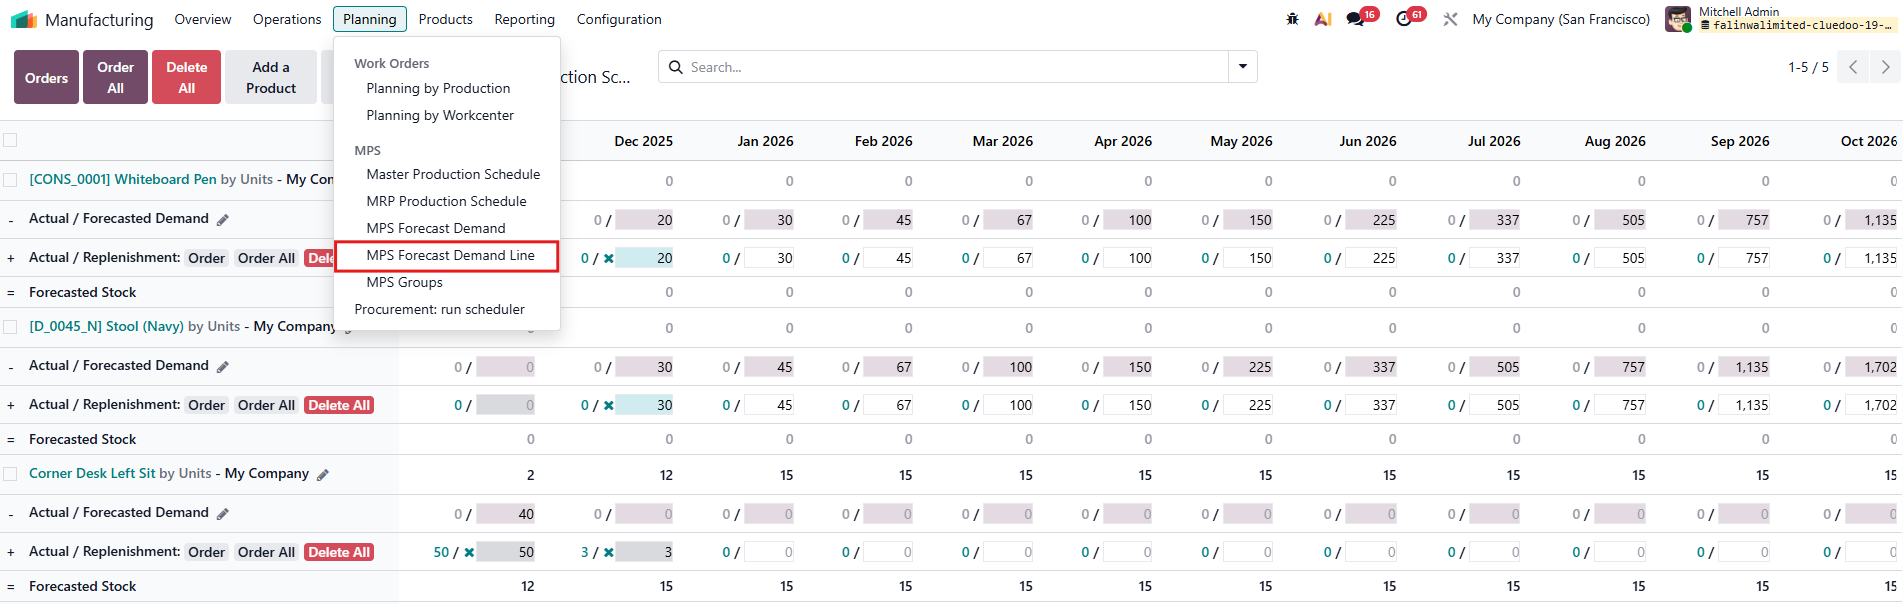
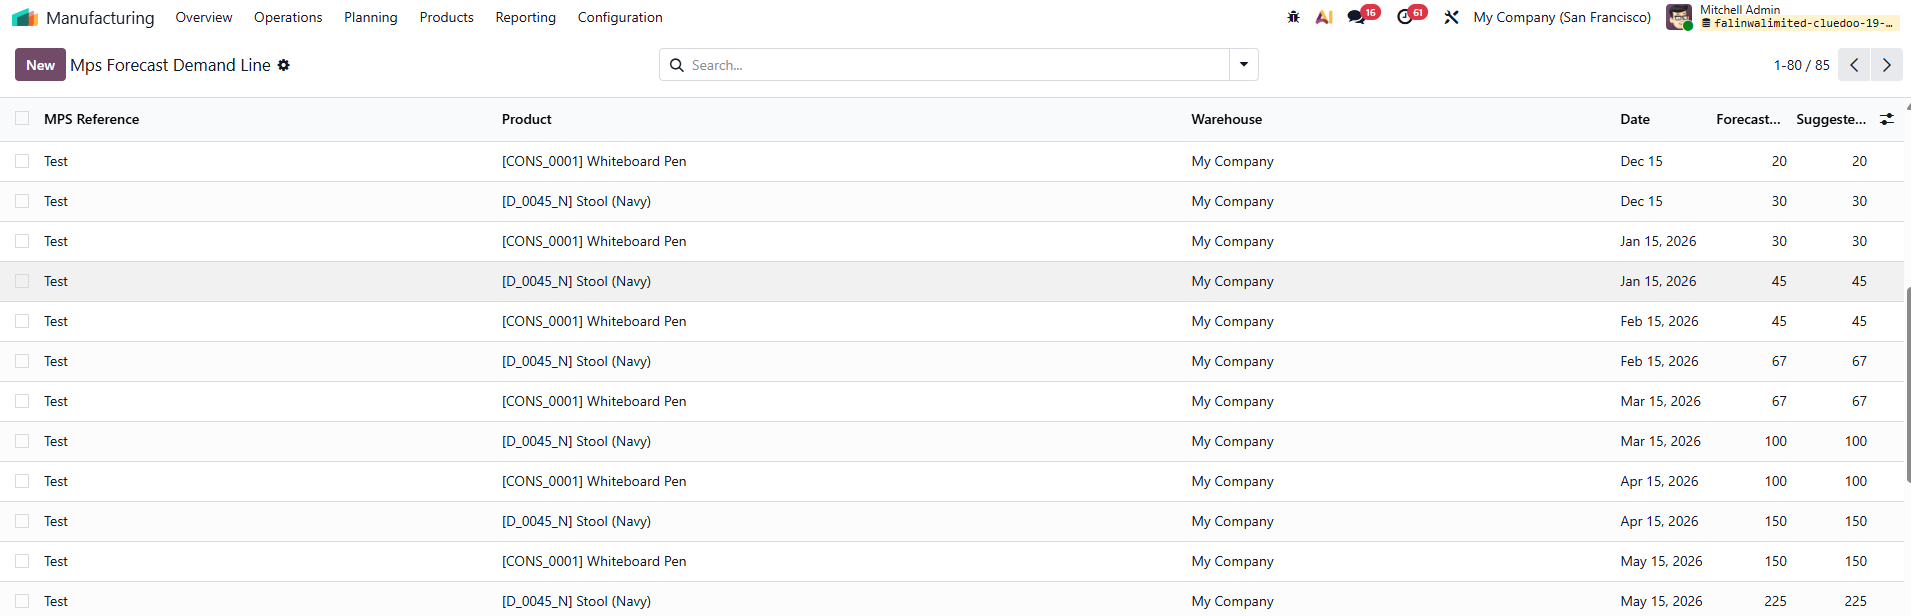
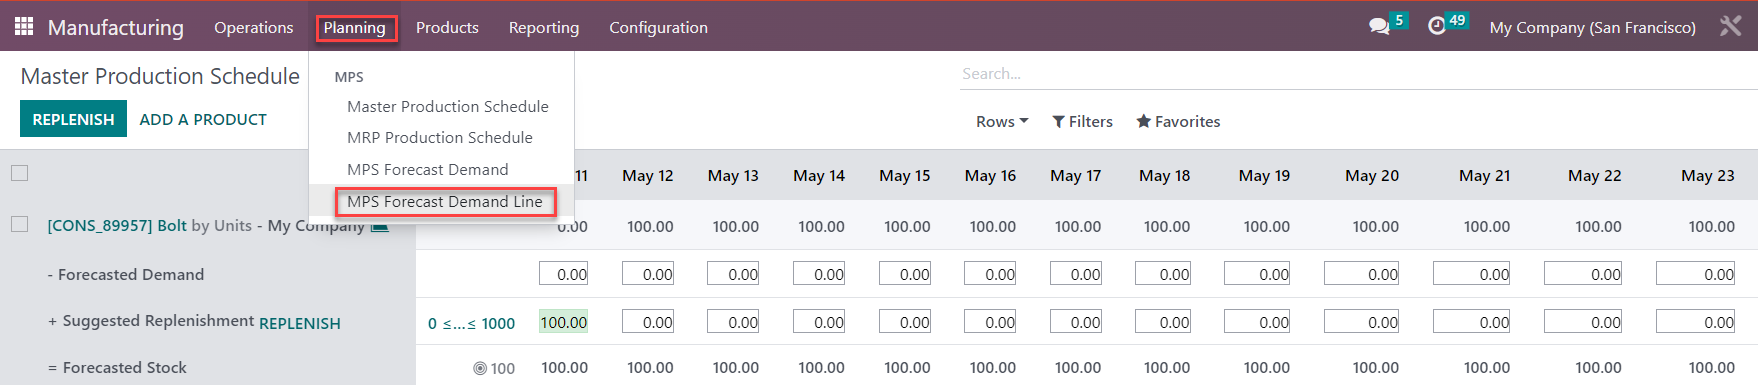
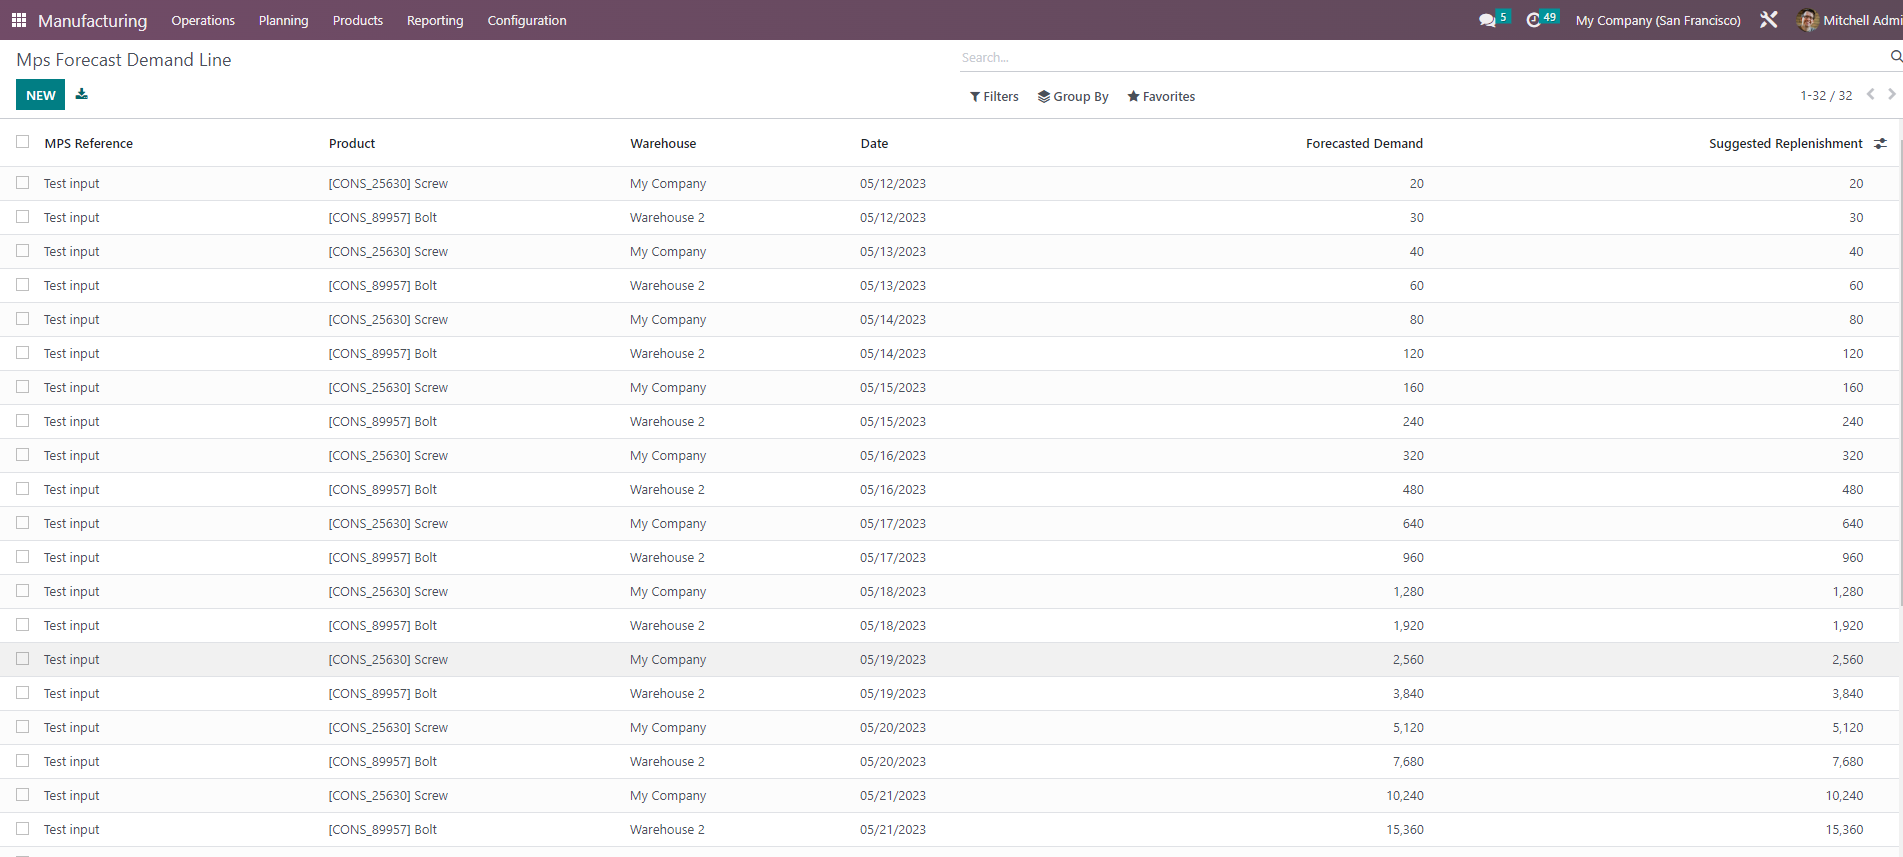
8. For easier tracking of MPS forecasted demand lines, go to Planning and click on "MPS Forecast Demand Line". Note: When the user edits data directly on the Master Production Schedule, the result will not update to the "MPS Forecast Demand Line".
|   |
HOW TO USE THIS MODULE
I. Advanced tool to input forecasted demand data
1. Go to Manufacturing → Planning to view a dropdown list including additional models:
- MRP Production Schedule
- MPS Forecast Demand
- MPS Forecast Demand Line
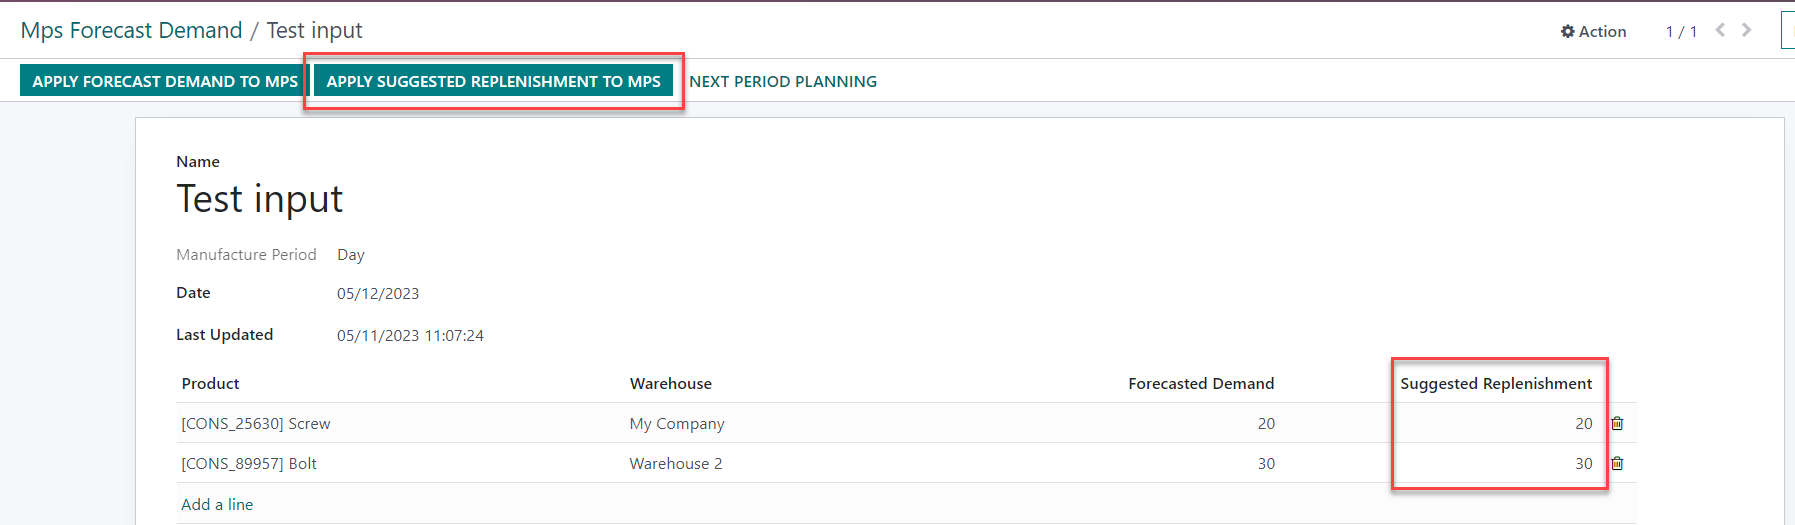
To add new forecasted demand data, click on MPS Forecast Demand and create a new forecast.


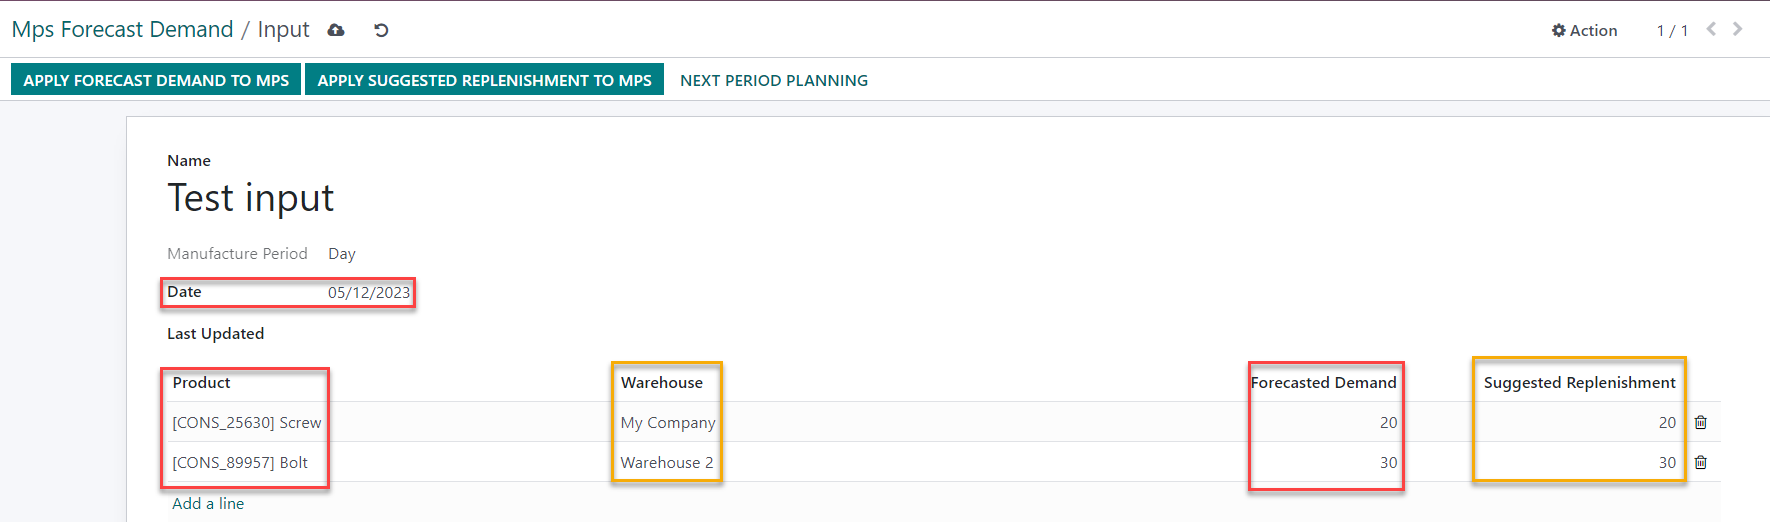
2. Input the following information:
- Forecasted date
- Forecasted demand for each product happening on that date
- Suggested replenishment (optional)
- Warehouse (mandatory)
3. To synchronize inputted data, including forecasted demand and suggested replenishment, to the Master Production Schedule, click "Apply Forecast Demand to MPS." Please note that only products already listed in the Master Production Schedule will be updated with the MPS Forecast Demand.
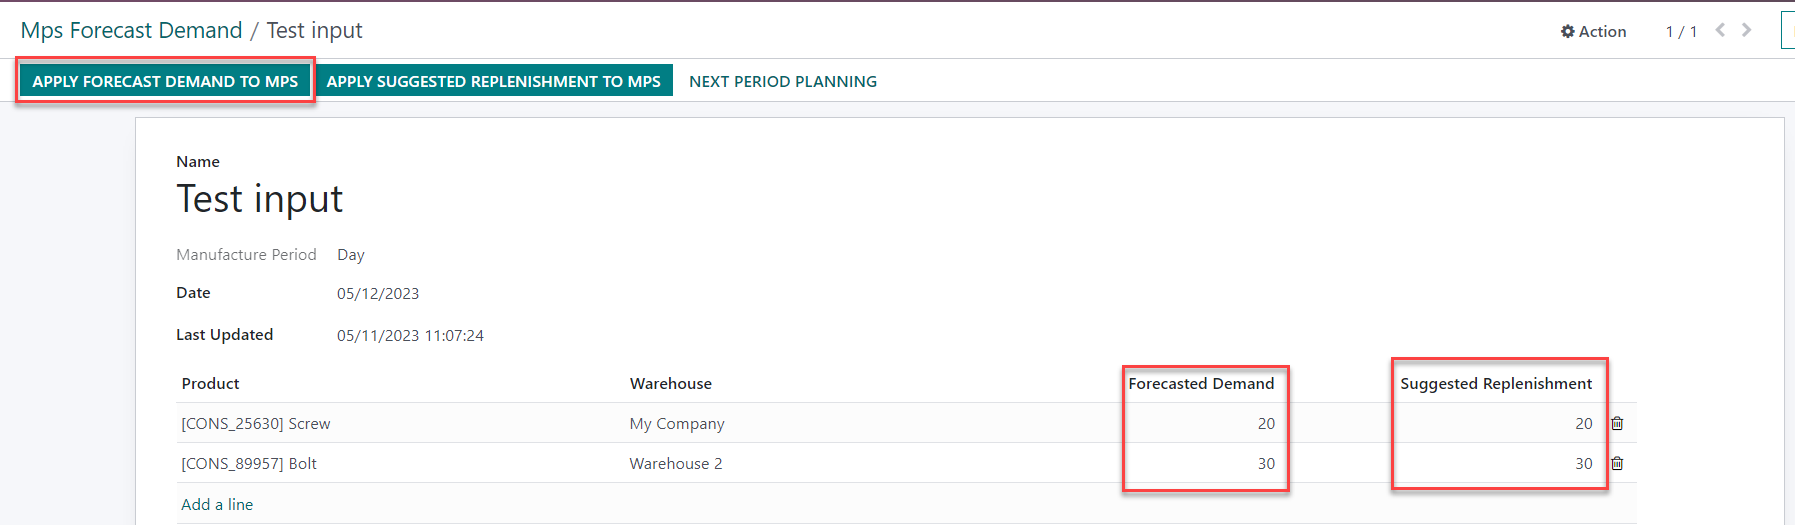
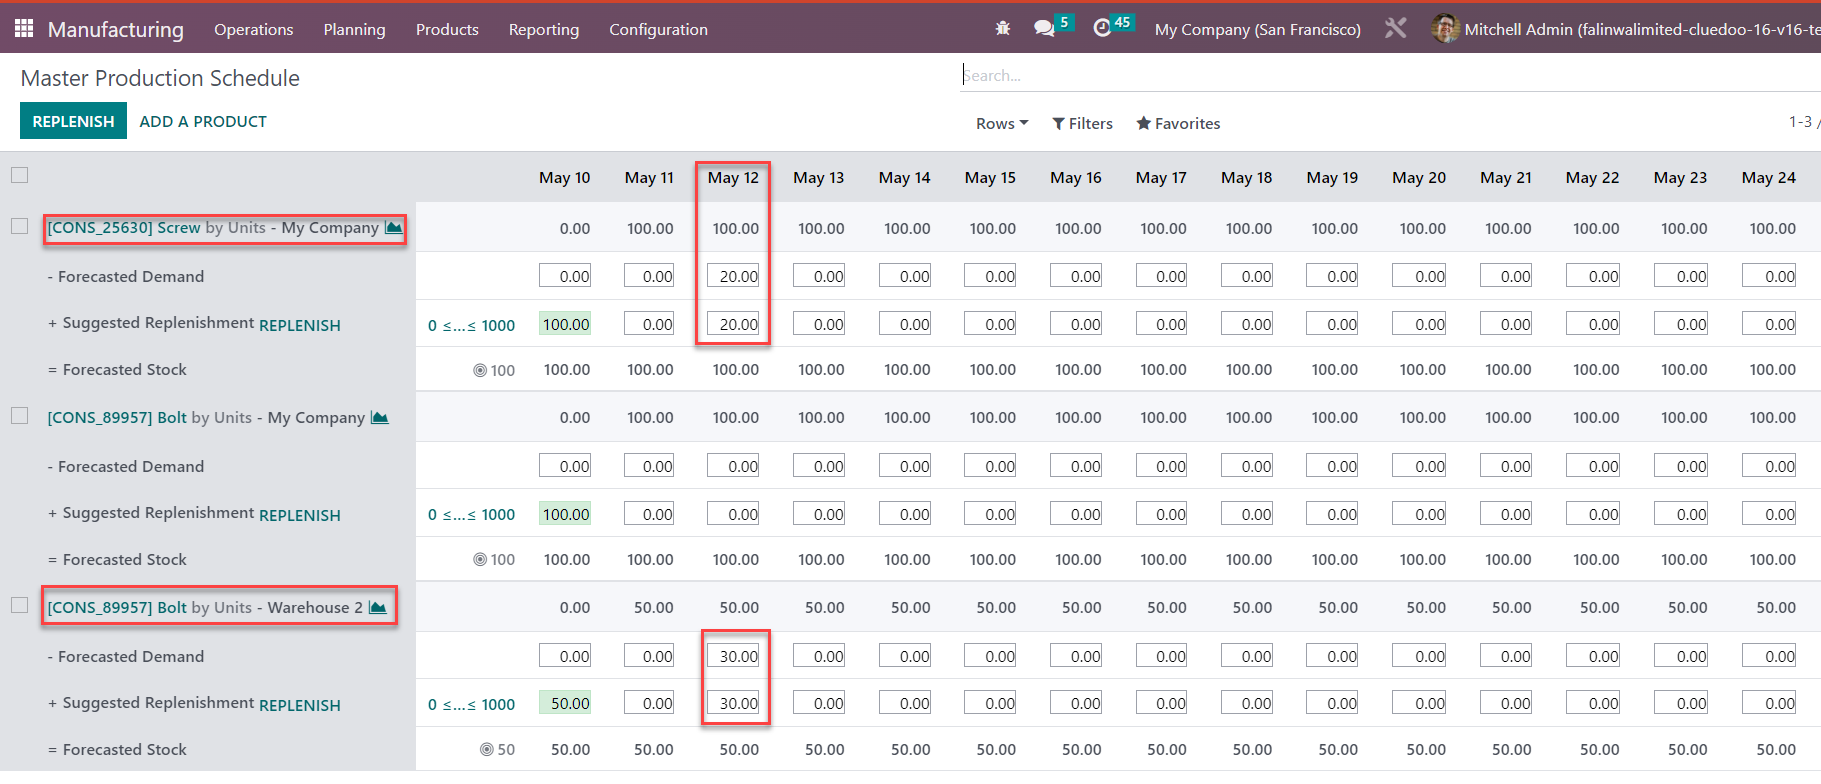
4. To synchronize inputted data, specifically suggested replenishment, to the Master Production Schedule, click "Apply Suggested Replenishment to MPS."
5. To create a rolling forecast from inputted forecast data, click on "Next Period Planning".
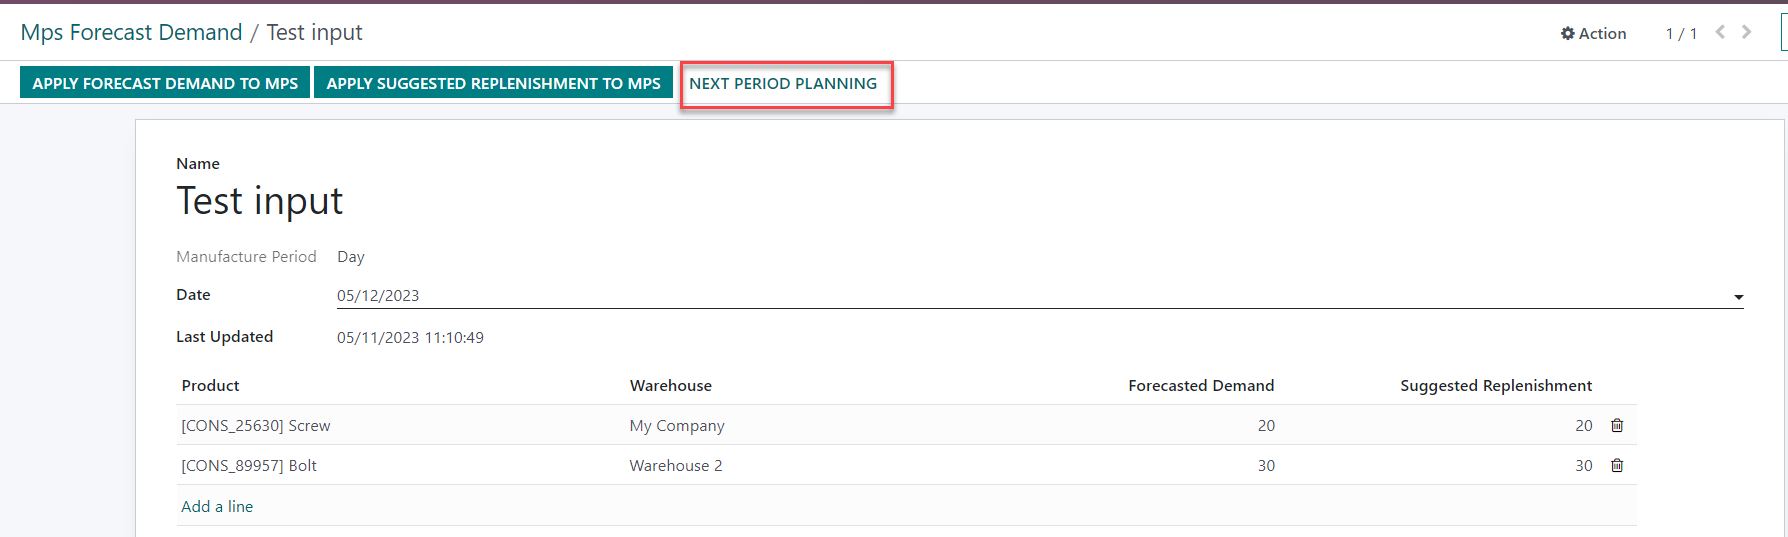
6. On the "Next Period Planning" wizard, fill in the period-over-period ratio of forecasted demand and the number of rolling periods.
Click on "Create MPS" to confirm.
7. Go back to "MPS Forecast Demand" master data. In this example, 15 sets of forecasted demand data have been generated.
Select 15 sets of data, go to "Action", and click on "Apply Forecast Demand to MPS".
8. For easier tracking of MPS forecasted demand lines, go to Planning and click on "MPS Forecast Demand Line".
Note: When the user edits data directly on the Master Production Schedule, the result will not update to the "MPS Forecast Demand Line".
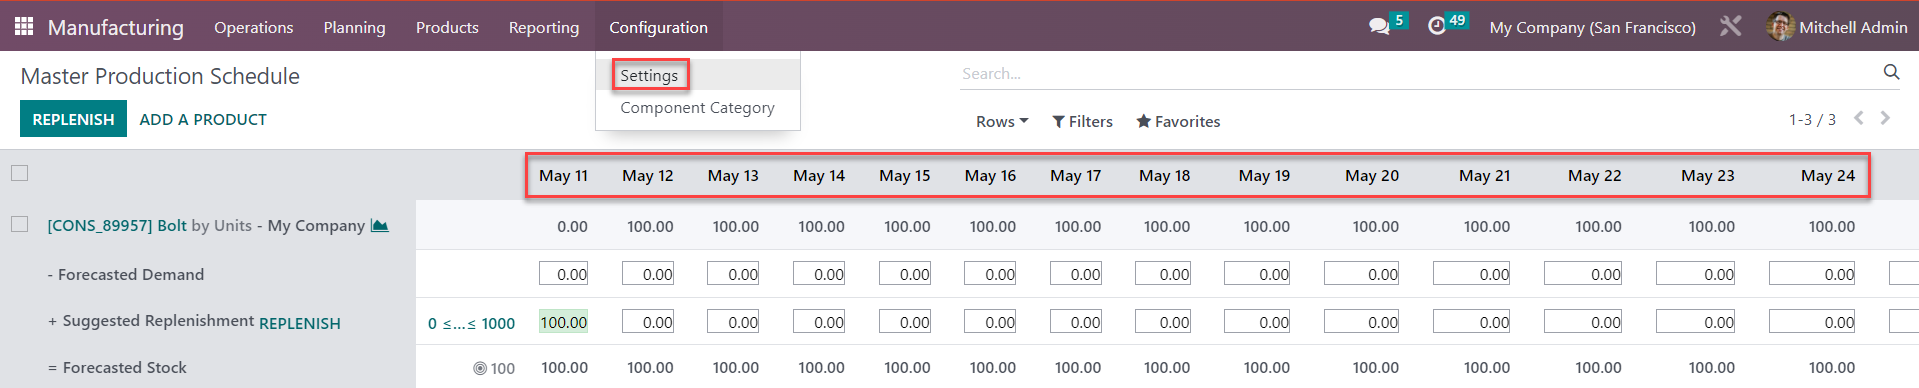
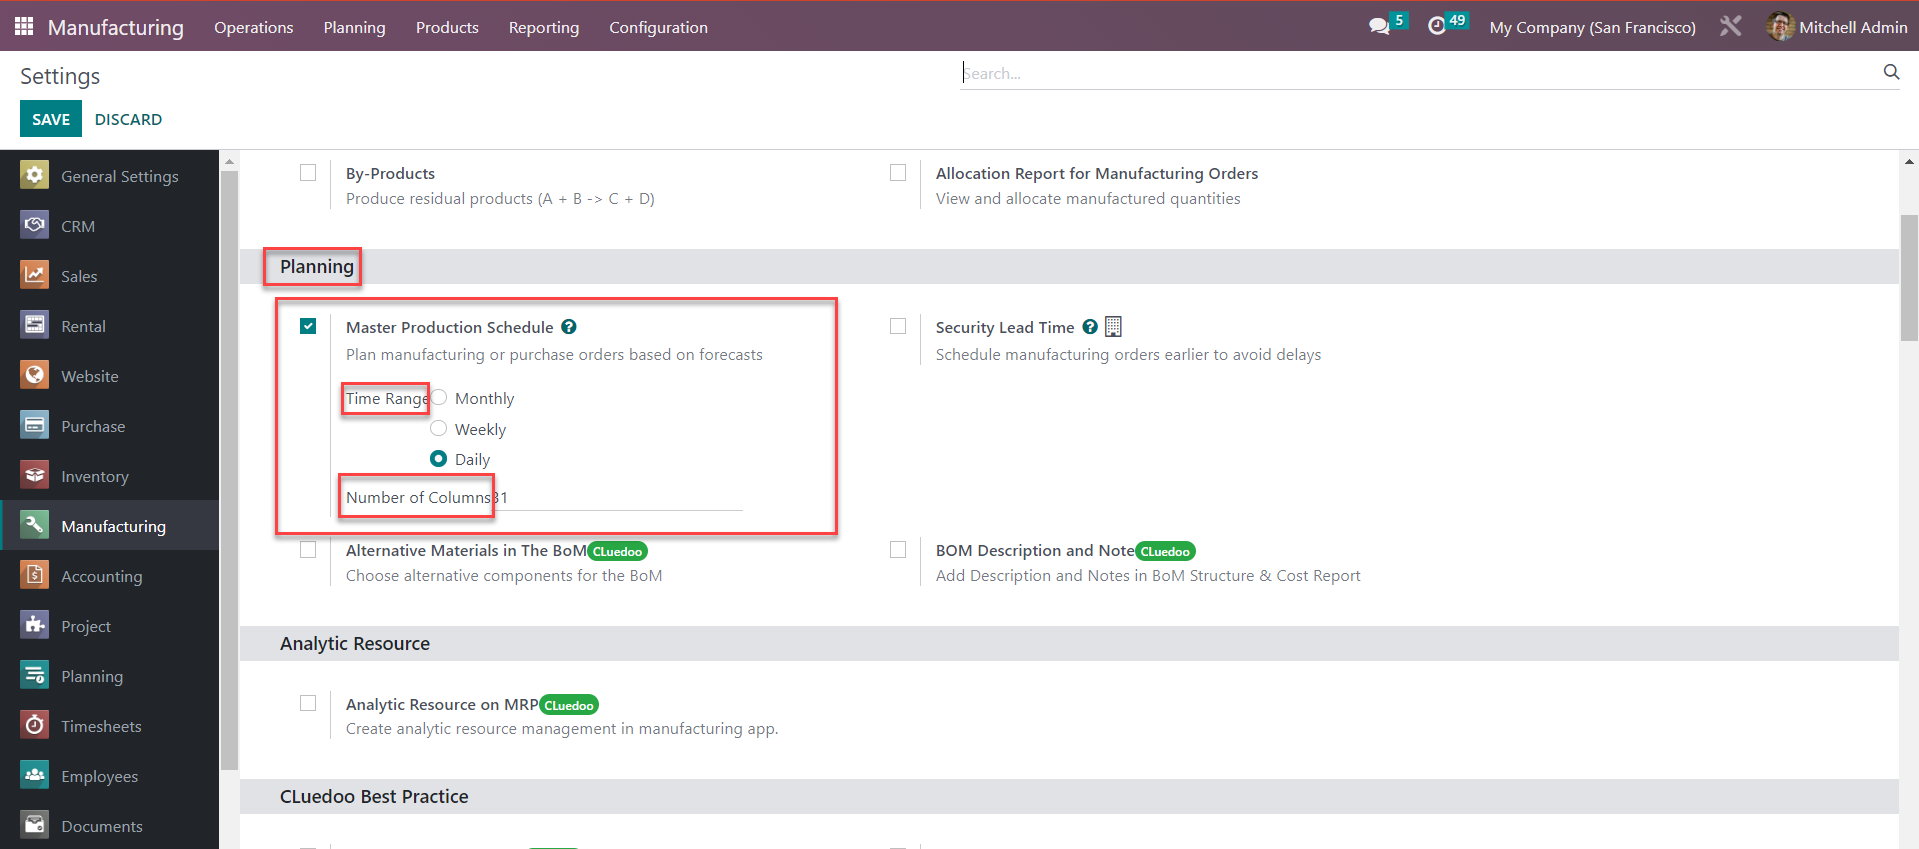
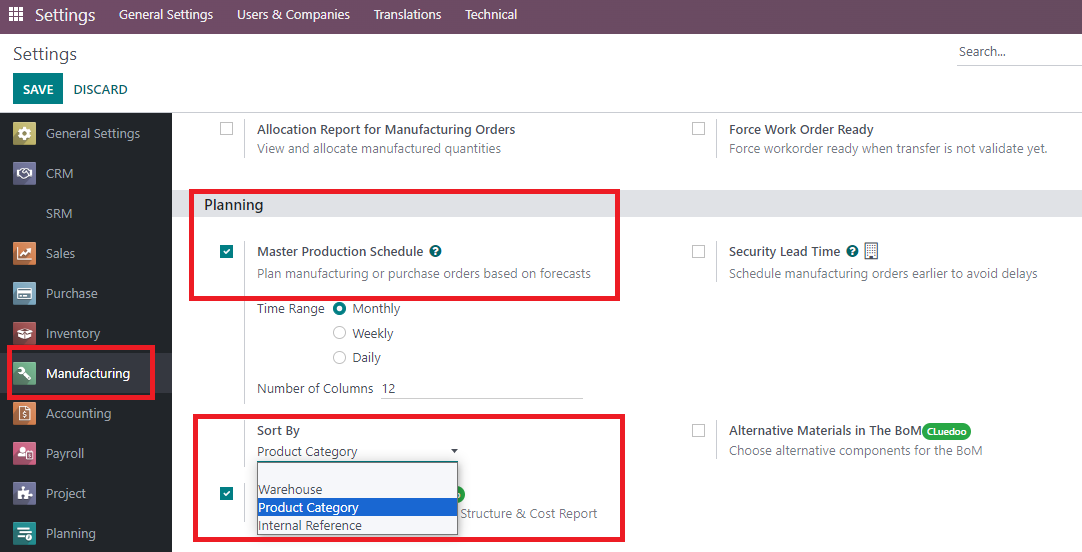
Note: The period type on Master Production Schedule can be configured by:
- Going to Manufacturing → Configuration/Setting → Planning
- Choose the period type Month/Week/Day
- Fill in the number of periods
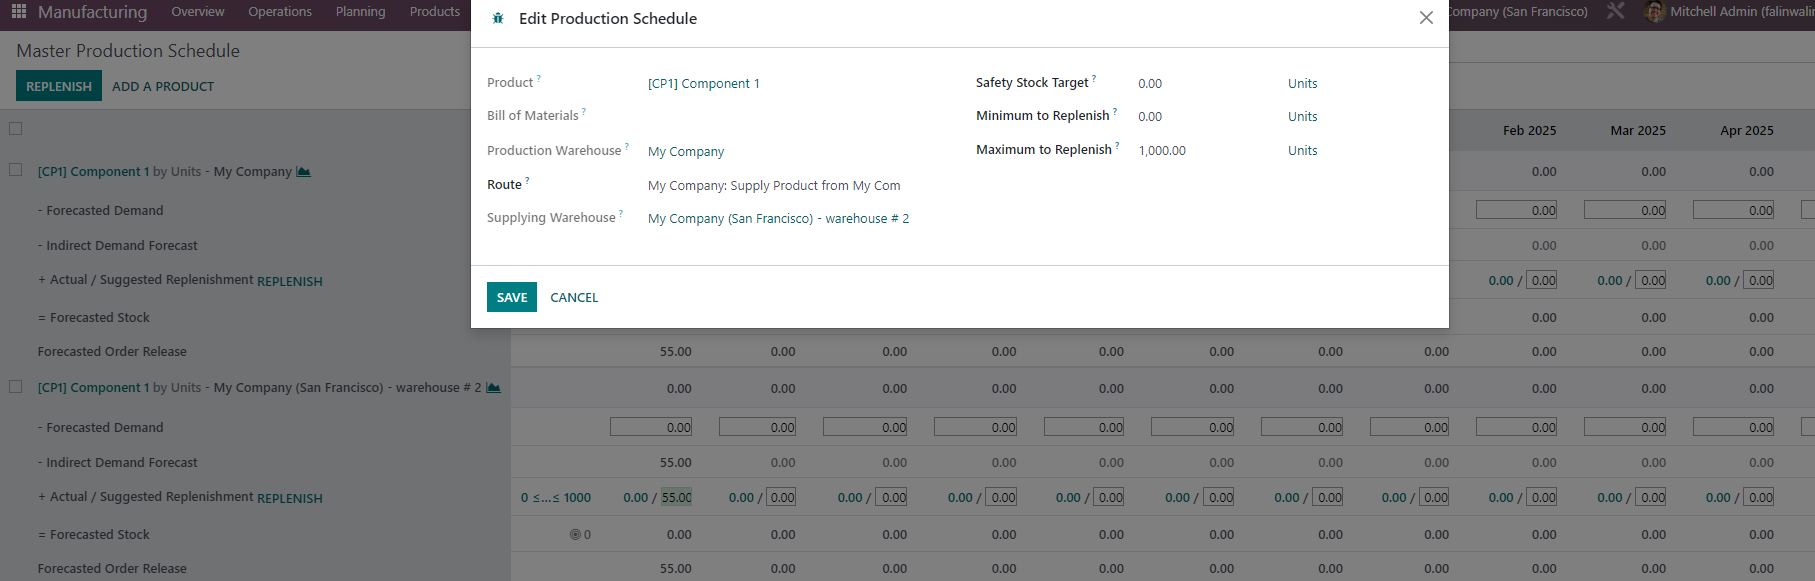
II. Select a specific route when adding a product to the MPS
Add a new product to the MPS and choose its route.
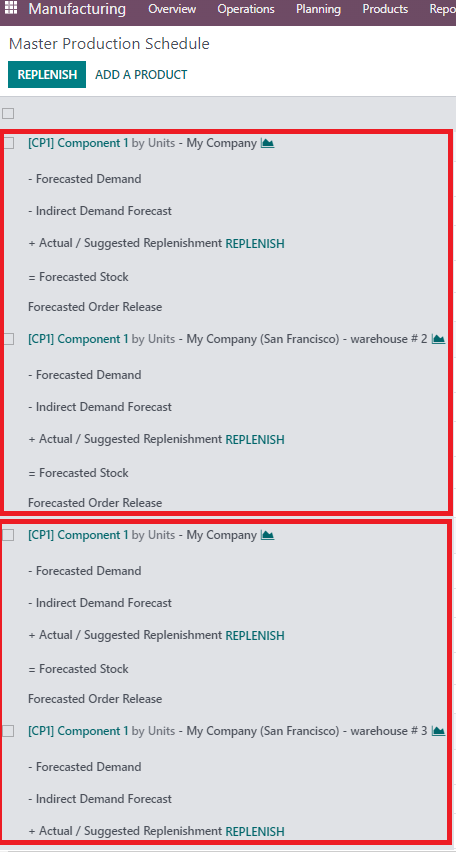
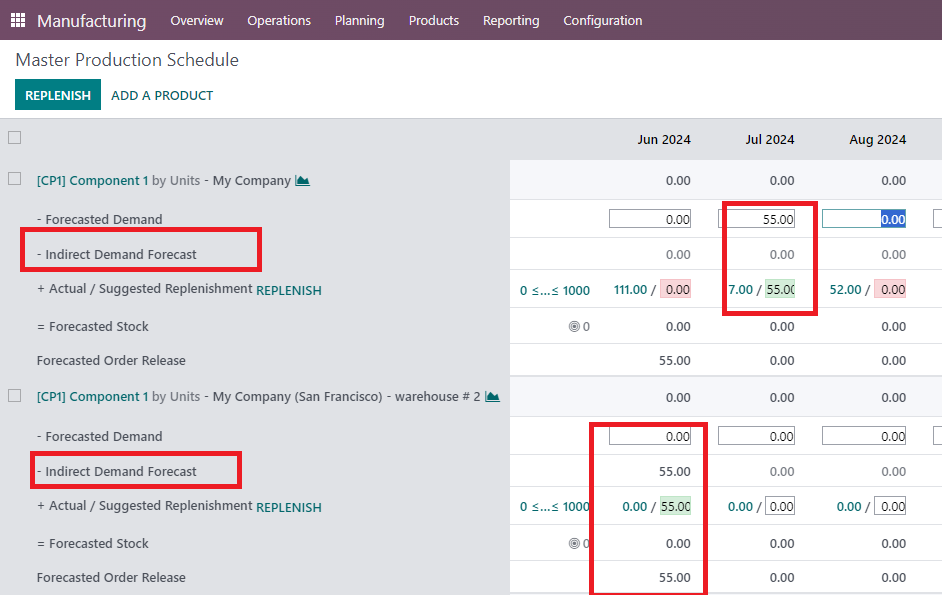
The MPS will now add and display the "Indirect Demand Forecast" for the first warehouse.

III. Indirect demand always visible and Indirect demand computation among routes
The qty of "Indirect Demand Forecast" CP1-warehouse 2 will automatically generated from "Forecasted Demand" of CP1-My company
IV. Showing supplying warehouse in the popup
Click in the number (picture attached) to get this information
V. Sort by:
Go to settings > Manufacturing > There are 3 options to choice
For ex: Sort by Warehouse > In MPS will show all results related to 1 warehouse
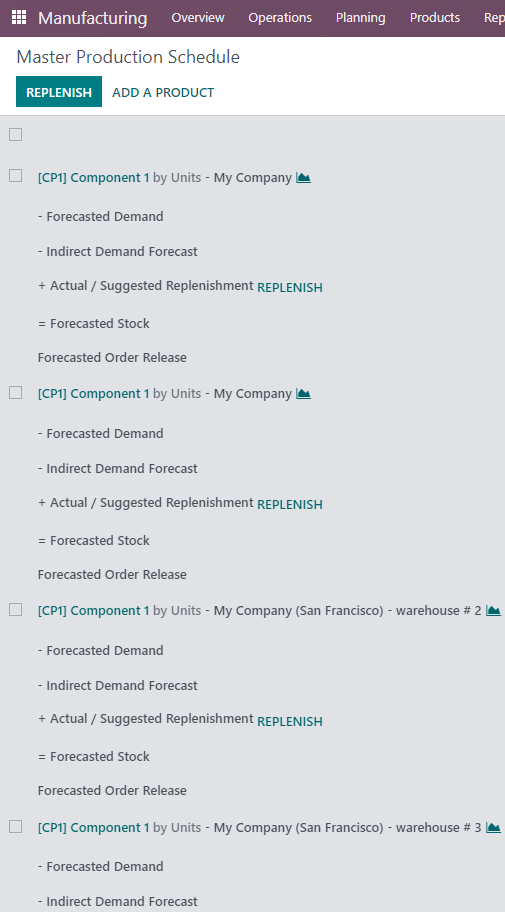
VI. 1 product with 2 routes
Principle:
if I add product CP1 (warehouse 1) with Route 1 (supply from W2) and Route 2 (supply from W3) --> in MPS I have:
CP1 W1 supply from W2
CP1 W2
CP1 W1 supply from W3
CP1 W3